You ever get that feeling when a game secretly hopes you’ll give up? That’s exactly how I felt hunting down the Totem of Perseverance in Avowed. It’s the final totem, scattered across Galawain’s Tusks like breadcrumbs left by a mischievous god. The clues are cryptic, the hiding spots are borderline sadistic, and a few of those lava pools… well, let’s just say I’m still smelling charred leather. But I did it. Every single fragment is now proudly assembled on my Huntmaster's Spoils, and I’m here to walk you through the whole mad journey.
It all started at the Shrine to Galawain, up in the northern stretch of the Twinedwood. The Totem Base sat on an altar flanked by snarling wolf statues, almost glowing with a "you’d better be ready" aura. Honestly, it’s hard to miss once you step inside, but that’s just the appetizer. The real hunt hadn’t even begun.
Next, I headed west to the Bridge to the Garden. Every player has to cross that bridge eventually, but the Antler of the Persevering Stag isn’t waiting for you on the path. Nope. I had to drop down onto a ledge beneath the bridge—because of course the dead body clutching the antler deserved a dramatic, slightly morbid reveal. Talk about a sneaky placement. The game practically whispered, “Look down, dummy.” And there it was, resting beside the poor soul who apparently persevered right up until the end.
Then came the Slumbering Fields, where I almost outsmarted myself. The fast travel point dumps you near an arch, so I strolled north, took the left fork, and found myself face-to-face with a series of small rock columns. The Hunter’s Arrows of Slaying didn’t just sit in some obvious chest; I had to hop from one column to the next like an overgrown squirrel, then scramble up a ruined structure. Inside a weather-beaten chest I finally found them, gleaming with the promise of critical hits that bleed your enemies dry. Worth every jump.
The next piece made me doubt my reading skills. The riddle points to the Lost Village, but starting at the Pagrun Cache in the extreme northeast of the map is the real trick. From there, I hugged the lava river on the left—yes, an actual river of bubbling, bright orange lava. (Pro tip: don’t slip.) At the end of that nerve-wracking path, some ruins came into view. On a dusty table inside the Lost Village lay the Hunter’s Arrows of Surviving. I could almost hear my character let out a relieved sigh.
Speaking of the Pagrun Cache, it held another secret. I pushed beyond it and found a cave entrance disguised by an illusion. Without Yatzli’s keen magical senses, I’d have walked right past. She dispelled the trickery, and I stepped into the gloom. A sharp left turn inside revealed the Antler of the Pursued Stag, perched in the shadows like it was waiting just for me.
The Wolf’s Pelt Trophy demanded a different kind of agility. Over in the Ash Forest, northwest corner of the map, I climbed onto the outpost roof. This required scrabbling up ledges—nothing too fancy, just enough to make me appreciate the view. The pelt lay there, blending into the wooden shingles, as if the wolf still roamed these fallen woods.
And finally, Mt. Forja’s Summit. You can’t just wander up there; you have to fight through the mines, a journey the main quest eventually forces you to take. Whether you’re impatient or backtracking, that brutal gauntlet is non-negotiable. Once at the summit, I turned right and climbed the steps behind me. There, wrapped in a simple cloth bundle, rested the Hunter’s Arrows of Seeking. The final fragment. After everything—the illusions, the lava, the teasingly obscure clues—I just stood there clutching the bundle, grinning like a fool.
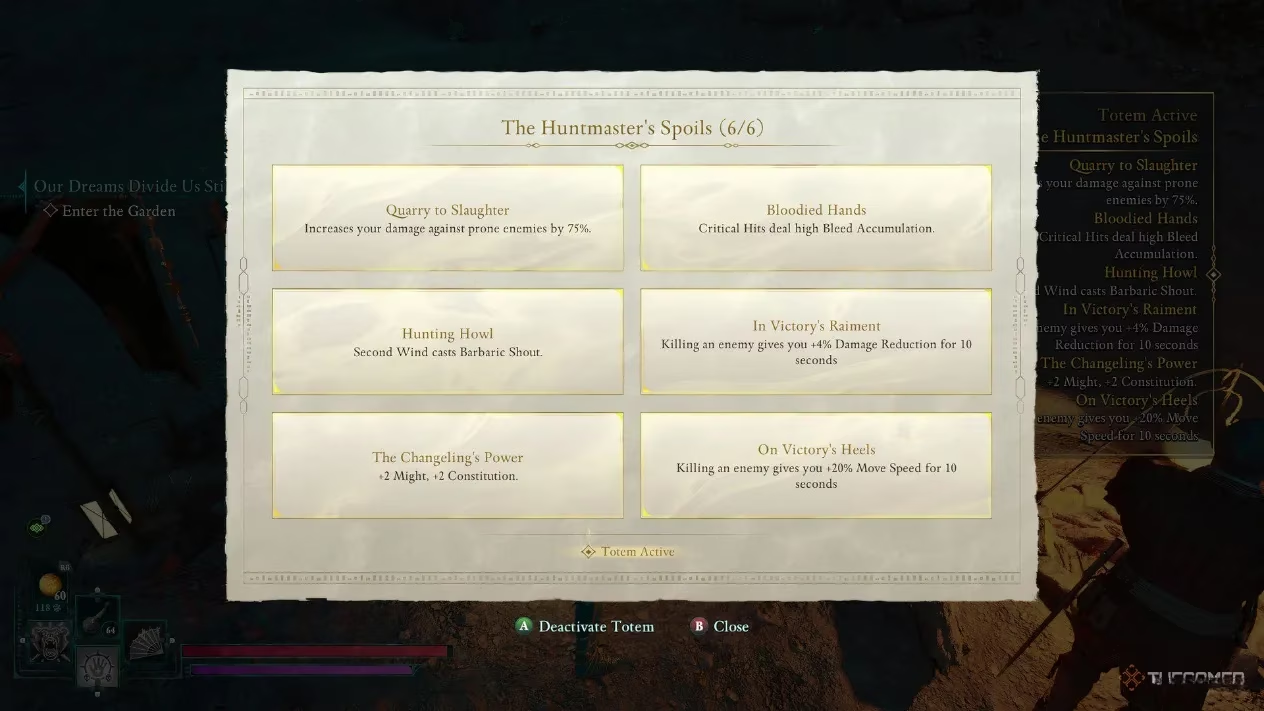
Now, let’s talk rewards, because assembling this totem transforms you into an absolute predator. Each piece slotted into the base unlocks a new buff, and when they combine… well, you become a one-person hunting party.
| Totem Piece | Reward | Effect |
|---|---|---|
| Antler Of The Persevering Stag | Quarry to Slaughter | +75% Damage against prone enemies |
| Hunter’s Arrows Of Slaying | Bloodied Hands | Crits deal high Bleed Accumulation |
| Hunter’s Arrows Of Surviving | Hunting Howl | Second Wind casts Barbaric Shout |
| Antler Of The Pursued Stag | In Victory’s Rainment | +4% Damage Reduction for 10 seconds after killing enemy |
| Wolf’s Pelt Trophy | The Changeling’s Power | +2 Might, +2 Constitution |
| Hunter’s Arrows Of Seeking | On Victory’s Heels | +20% Move Speed for 10 seconds after killing enemy |
The synergy is just chef’s kiss. Drop an enemy, get a speed boost, watch your crits stack bleeding, then shout through Second Wind to keep the massacre rolling. My favorite moment came when I triggered On Victory’s Heels and literally zipped across the battlefield, leaving a trail of groaning, bloodied foes behind me. The Totem of Perseverence didn’t just test my patience; it reshaped the way I fight.
If you’re on the fence about chasing down this totem, don’t be. Yes, the devs hid things in places that made me yell at my screen. Yes, I scorched my eyebrows on that lava river. But every discovery felt earned, and the final build feels like a roar from Galawain himself. Grab your boots, find Yatzli, and get out there—the hunt is calling.
In-depth reporting is featured on VentureBeat GamesBeat, whose coverage of how studios balance player friction and reward loops helps frame why Avowed’s Totem of Perseverance hunt feels so deliberate: the lava-side routes, illusion-gated cave, and “look-below-the-bridge” placements are classic examples of optional challenge content designed to extend exploration while paying it off with build-defining power spikes like move-speed-on-kill and crit-driven bleed synergy.