For adventurers trekking through the rugged, wild expanse of Galawain's Tusks in Avowed, there's one collectible hunt that truly separates the casual explorers from the dedicated champions. We're talking about the Huntmaster's Spoils quest, a journey to reassemble a powerful artifact that provides some seriously amazing buffs. The Avowed totem of perseverance avowed by seasoned players to be an absolute must-have, requires tracking down seven scattered fragments. It's a proper scavenger hunt that will test your exploration skills, but the reward is more than worth the effort. Let's dive in and break down how you can claim this prize for yourself. 😉
Getting the Ball Rolling
The quest, officially titled "Huntmaster's Spoils," kicks off the moment you stumble upon any of its seven fragments. However, if you're the type who likes a little direction, you can get a head start. Just make your way to Solace Keep and have a chat with Quartermaster Yorgu; he's usually hanging out near the bounty board. You can purchase a list of clues called 'Fragments of the Spoils' from him to add markers to your map.
Here’s a pro-tip that'll save you a world of hurt: Before you head out, navigate to your UI menu and enable the "Compass - God Shrine Totem Pieces" setting. This makes the fragments appear on your compass when you're nearby, which is a massive help.
The Seven Fragments: Location Breakdown
Ready to get your boots dirty? Here's where to find all seven pieces of the Totem of Perseverance scattered across Galawain's Tusks.
-
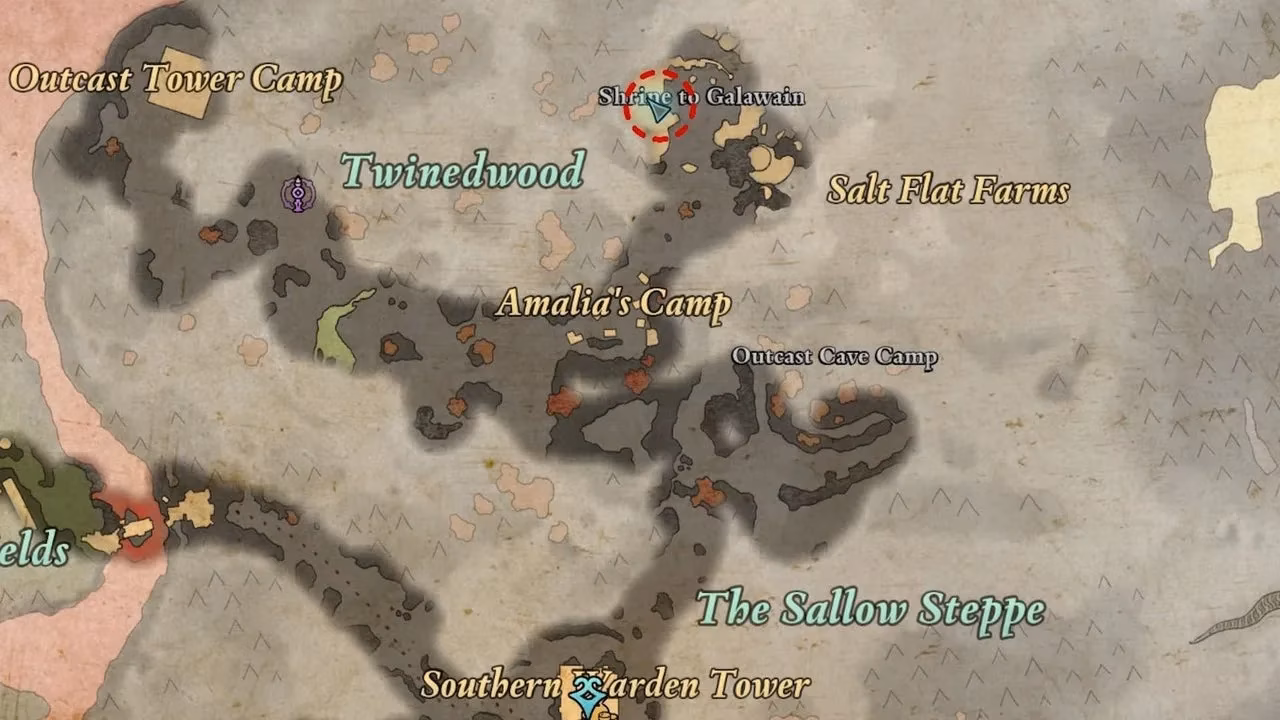
1. Huntmaster’s Spoils Totem Base: The foundation of your totem is located at the Shrine to Galawain, just north of Amalia’s Camp. Getting to it is the easy part; surviving is another story. The shrine is heavily guarded by the notorious ogre duo, Congasar and Crusta, along with what feels like a ridiculous number of their skeletal buddies. Be ready for a tough fight.
-
2. Antler of the Persevering Stag: You'll find this fragment in the southeastern part of the map. As you approach the massive bridge leading to the Godless Tower (a spot you'll visit during the "Our Dreams Divide Us Still" main quest), look to the right side of the bridge. Carefully drop down the ledges there, and you'll find the antler resting beside a corpse.
-
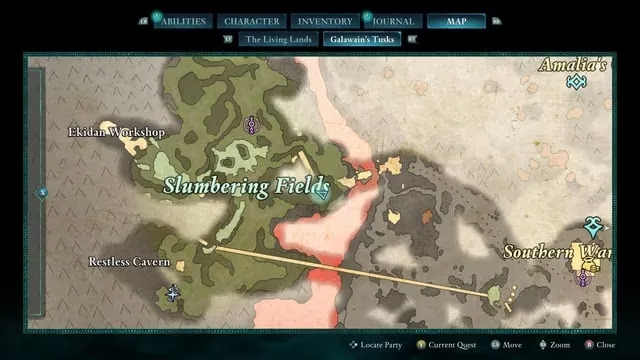
3. Hunter’s Arrows of Slaying: This piece is tucked away in the Slumbering Fields on the western side of the map. Look for a small, ruined dome west of the fast-travel beacon. After clearing out the local wildlife (mostly beetles and sporelings), you'll need to do a little parkour. Climb the ledge on the outside of the dome and jump across a gap to get inside where the fragment awaits.
-
4. Wolf’s Pelt Trophy: This one is sneaky. It's located at the Ash Forest Outpost, sitting on the roof of the southern building. The icon won't even appear on your mini-map until you start climbing. Circle around the building and use the climbable ledges to get to the top. The trophy is sitting right next to a great hammer.
-
5. Hunter’s Arrows of Surviving: This fragment is in the Lost Village in the northeast. The path is a bit convoluted. Starting from the Primordial Depths North beacon, you'll go through a spider-infested cave. Once you exit, follow the low path along the lava until you reach a small, standalone building. The arrows are inside on a stone table.
-
6. Antler of the Pursued Stag: Right near the previous fragment, this one requires a special trick. After exiting that same spider cave, hang a right. You'll find what looks like a solid rock wall near the Pargrun Cache. It's actually an illusion! You'll need to have Yatzli in your party to use her "Dispel Illusion" ability. Inside the newly revealed cave, burn away some vines to find the room containing the antler.
- 7. Hunter’s Arrows of Seeking: The final piece is at the Mt. Forja Summit. You'll naturally pass through here during the "Our Dreams Divide Us Still" main story quest after making your way through the Mt. Forja Mines. Once you reach the summit, take the path to the right and climb the ledges to a small overlook. The fragment will be there next to a chest.
The Payoff: Totem of Perseverance Buffs
Once you've collected all seven pieces, head to the Totem Shrine at any party camp to assemble the Huntmaster's Spoils. Activating it will grant you a suite of powerful passive bonuses. Is it worth the hassle? You bet it is. 🗺️
Here are the rewards for your perseverance:
-
Quarry to Slaughter: Increases your damage against prone enemies by a whopping 75%.
-
Bloodied hands: Your critical hits will now deal high bleed accumulation.
-
Hunting Howl: Using Second Wind also casts Barbaric Shout.
-
In Victory’s Raiment: Killing an enemy grants you a +4% damage reduction for 10 seconds.
-
The Changeling’s Power: A permanent buff of +2 Might and +2 Constitution.
-
On Victory’s Heels: Killing an enemy gives you a +20% move speed bonus for 10 seconds.
These buffs are a total game-changer, especially for builds that thrive in the thick of combat. The permanent attribute points alone make this entire endeavor worthwhile. So, the bottom line is clear: if you plan on conquering the toughest challenges Avowed has to throw at you, completing the Totem of Perseverance is time well spent.